Saturday, November 30, 2013

Brother & Mother Quilts

I'm officially a year behind in posting, so the next few posts will be brief and full of pictures. Once I started quilting, my brother made a request for an LSU quilt (his alma mater). He kept getting bumped down the list for new baby quilts, which he wasn't too happy about. But I finally started working on his quilt last fall and finished it up for his birthday in November. 

This is the first quilt I've done with black sashing. I also used purple and gold thread for the quilting. Using colors on black fabric really emphasizes any uneven or crooked stitching, so I'm not sure I'd do it again, but the effect is kind of neat. Most of the fabric came from fabric.com and an Etsy shop specializing in fabrics using school colors. My favorite is the purple fleur-de-lis on a gold background. You can't get much more Louisiana than that! The backing is a basic gingham from Joann that was on sale.

Unfortunately, the original pics of this quilt were lost when my old computer crashed, so here it is at 8 months old. It's already been very loved, as it lives in the rec room with the big TV and my brother's multiple gaming systems. (It could also use a good wash! The other thing about black sashing is that it attracts lint and dust like nothing else!)


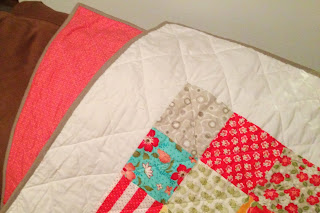
After a brief break over the holidays, I started on a quilt for my mom. She lives in Michigan and faces some cold, cold weather, so I thought she could use a nice lap quilt for watching TV or reading. I used fabrics from Bonnie & Camille's Marmalade and Vintage Modern lines. (I figured it was fitting, since they are a mother-daughter design team!) They have some nice floral patterns in soft colors, but aren't too chintzy or precious.

I wanted to do something a little different with this quilt, so I stitched together a bunch of charm squares into one large block, then used a wide border to fill out the quilt. I quilted a criss-cross pattern, which involved a yard stick and soluble marking pen, but I'm pleased with how it turned out. For the backing, I used a pink pattern from Connecting Threads and pieced a long row of leftover fabric from the quilt top. The binding is a nice grayish-taupe color from Moda that coordinates with some of the prints on the front. All in all, I think this is my most well-constructed quilt. I'm finally at the point where I feel comfortable breaking away from patterns and tutorials and doing things my own way.

A preview of the quilting in progress, to prove to my mom that her quilt was actually coming together!


She seems to love it, though moms usually do, don't they? For those of you keeping score, I've now made quilts for everyone in my immediate family, including myself. Hopefully, this will keep them happy for a while so I can focus on another slew of baby quilts for expectant friends. :)


Monday, July 1, 2013

Going back in time!

It's been a while! There's been a broken laptop, a trip to England, and another broken laptop (now fixed!) since my last post. But you haven't missed much; very little sewing or embroidery has taken place since I last wrote. I did make some fabulous acquisitions from Liberty on vacation (I could have spent my entire savings in there), but I'm still figuring out what to do with it all.

However, I still need to catch up with writing about my finished projects. Hop in my time machine (or TARDIS, if you will) and we'll travel back a year...

It was summer 2012, very sticky and steamy. Sometime in August, I began working on a 30th birthday quilt for Drea, one of my best friends. She and her husband had just bought their first house and they painted their living room walls mint green to coordinate with the previous residents' unusual choice of carpeting. It instantly reminded me of  an Amy Butler print

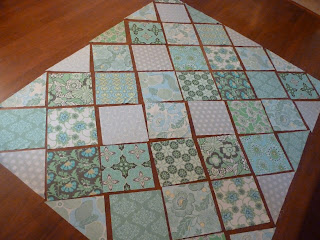
So, the soft green fabrics in Amy Butler's Daisy Chain and Midwest Modern  / Midwest Modern 2 lines became the foundation of the quilt. I chose a few Joel Dewberry patterns from the Heirloom collection to fill it out and Lizzy House's Jewels for the small pieces. I had a difficult time finding a backing fabric in a similar colorway that wasn't too pricey. I ended up using a coupon and ordering a cute green floral print from Joann.  (I used the extra to make the oven mitts in the previous post!)

I worked from the Lattice Quilt pattern by Amy Smart. It was definitely the most complex pattern I've done! After cutting the squares and triangles, I laid everything out to make sure the fabrics looked good together:


Then I cut all the sashing. There was lots and lots of sashing! For this pattern, you have to piece together each row on the diagonal and then sew on the triangle corners. I kept forgetting which way the triangles pointed and had to break out the seam ripper a few times. The tiny squares kept getting lost in the shuffle, too. I opted to omit the extra border in the pattern, since the quilt was plenty big for a lap quilt. I shadow-quilted the diagonal lines and bound it in a light green.

I finished the quilt about 2 months after Drea's birthday, but she knew it was coming! I ended up dropping it off a few hours before Hurricane Sandy hit, so she was able to use it during the storm. Unfortunately, all of the pictures I took of the quilt after I finished it were casualties of my crashed laptop. Drea sent this one along, though:


Perhaps I'll pester her to take some more the next time I'm at her house. :)

UPDATE: Some more pictures!


Saturday, February 9, 2013

Learning New Things

It snowed a few inches here yesterday and I've been using the wintry weather as an excuse to catch up on some sewing. I also tackled two of my sewing phobias -- free-motion quilting and zippers!

On several of the blogs I read, fabrics are quilted with gorgeous shapes and patterns -- flowers, loop-de-loops, vines, you name it. I usually rely on good old straight-line quilting because it's easy and I doubted my cheap sewing machine's capabilities to do anything trickier, but I should have had more faith. After finally reading the manual cover-to-cover, I figured out that all I needed in order to free-motion quilt was to snap a little plate on top of the feed dogs. Done! I used the same straight stitch that I use for my regular quilting. I'm kind of embarrassed it took me so long to figure it out.

I did a practice run on a sample quilt sandwich, and while it certainly wasn't perfect and I think I need a higher-tech machine to really achieve anything exciting, I was successful in quilting a few basic patterns. It took a few tries to get the hang of the speed and motion (it's a real workout for your arms!), but I'm glad I finally know how to do it. I ended up making these oven mitts, using a free pattern from Skip to My Lou and some wavy quilting lines.


I also ordered a couple of zippers last week, deciding it was finally time to take the plunge and figure out how to sew them on. There are quite a few helpful tutorials I found via Pinterest, and I ended up consulting a few of them to figure out a method that works for me. Bottom line: zippers are not really all that scary! You just have to be mindful of how far the zipper is from your foot. (In one instance, I got a little too close and the zipper caught on the fabric when I tried to open or close it. It required a few extra stitches to pull the fabric out of the way, but I'm happy I was able to figure out a solution all on my own!)

I made two pouches: one from some awesome Rainy Day fabric I found on Connecting Threads, and the other from V and Co's Simply Color line with some leftover Pat Bravo fabric from last year's Aviary quilt. For the purple pouch, I figured out how to add a bit of fabric on either side of the zipper, allowing for a bit more room. I also boxed the bottom corners to allow for a wider storage space. Now that I can add zippers, I want to make all sorts of pouches in all sorts of sizes!


Yesterday, I made a curtain for a bookcase in my room that I recently repurposed for make-up/jewelry/random beauty stuff storage. I bought a larger bookcase for my actual books, and since then, I've spent the last few weekends purging and reorganizing my room. I have a pretty small room, so when it gets cluttered, it's really noticeable. I made a concerted effort to evaluate what I actually need versus what I was holding onto for sentimental reasons. I managed to get rid of six garbage bags full of stuff! It was a big task, but I'm much happier with my living space now.

Using this bookcase for storage allowed me to clear my dresser tops of all sorts of bottles and containers, but I wanted to be able to hide it all away. I had bought some storage cubes from IKEA which were supposed to go in my drawers but ended up fitting nicely on the shelf. When I saw that the Simply Color line (mentioned above) had hit stores, I knew the eggplant colorway would be perfect in my room, so I ordered two yards of the vine fabric. I measured the size of the book case, and made the curtain about 15 inches wider, just so it has that drapey, curtainy look. The height is just the selvage-to-selvage width allowing for a hem and the curtain rod opening at the top. (It is not a precise science!) I hung it on a tension rod and voila!


(Apologies for the not-so-great  pictures. My brother took my camera  with him on his Caribbean cruise, so I had to use my phone.)

I reorganized all of my sewing supplies, too, including my burgeoning fabric stash. I also bought a labelmaker, which I've been using to label everything. It's my new favorite toy! Additionally, I've started using plastic mesh bags to store the fabric and supplies for works-in-progress. It has gone a long way toward helping me keep my sanity in my sewing space -- which is, incidentally, also the dining room that I share with my (very patient) roommate. I see all these pictures online of dedicated craft rooms and huge sewing tables, and I get all kinds of jealous. I always wonder how non-rich, non-professional crafty people cope with real spaces.

I swear I will show pictures of Drea's quilt next time, but I just wanted to mention these little projects while they are still on my mind. As for the rest of this weekend, I might finally cut into my Liberty Lifestyle fabric that's intended for a second quilt of my very own. We'll see how brave I'm feeling!

Monday, January 14, 2013

A Baby Quilt for Sarah

Wow, it's been a long time since I've posted! I've finished three quilts in that time, and a few sewing projects, but haven't done much in the way of embroidery, sadly.

Over the summer, I made a baby quilt for my cousin's brand-new daughter, Sarah Catherine. I used this Simple Stripes Baby Quilt tutorial from Amy Smart, though I ended up cutting one of the main pieces a little too small and had to adjust the overall size of the quilt to compensate. Still, since it was for a baby, I figured it wouldn't make too much of a difference!

My cousin isn't a big fan of pink for girls (and neither am I, as a result of pink overkill when I was little), so I wanted to use bright colors that were girly without being too princessy. I came across the Delighted line by the Quilted Fish a while back and figured it would work well for little Miss Sarah with its red, yellow, aqua, and green palette. I rounded out my fabric choices with some similarly colored selections from Connecting Threads and Joel Dewberry's Modern Meadow aqua herringbone--a favorite of mine!

Since I am a little bit obsessive about block placement, I carefully arranged the blocks ahead of time. (Notice they fall in diagonal stripes of coordinating colors!) Per Amy's tutorial, I also rotated the blocks so the stripes are on different sides across rows and down columns. These are the sorts of puzzles that can be a headache in larger quilts, but work like a dream in smaller quilts.

Here's the finished product:


For the quilting, I stitches double rows of straight diagonals. (I drew diagonal lines on the fabric with a water-soluble marker and stitched 3/8 inch on either side of the lines.) I really liked the criss-cross effect it made, and were it not so time consuming, I might stitch double lines all the time!


The binding is a red/pink herringbone from The Quilted Fish's more recent Apple of My Eye line. I love how it turned out. The backing was a great bargain I ordered from Connecting Threads. (I think it was about $3 a yard!) It's not a perfect match with the larger prints on the front of the quilt, but the colors go nicely and I like the happy flowers. (Though I hadn't initially intended to, I ended up using some of this print on the front, too.)


And, of course I had to embroider a little note to Sarah! I used red floss on a red print, so it wouldn't stand out too much.


(If you want to know a secret, the heart actually covers up a little mistake. See, I sometimes use my ironing board as a surface for hot gluing other projects, and a bit of glue was hanging out on the board when I was pressing the quilt top. I didn't realize it had stuck to the fabric until it was too late to get it off, so I covered the small splotch with embroidery. Lesson learned -- do not glue where you iron! Don't tell Sarah!)

The quilt was ready just in time for my first encounter with Sarah, when she was just 5 days old. (Today, she is officially 5 months old and is as cute as a button!) The quilt seemed to go over well, and I hope it's something she can enjoy when as she grows. It was also nice to make something for a baby girl! Our family consists of mostly guys, so the females really have to stick together.

Next time, I'll show you Drea's housewarming/birthday quilt, which was a long time in the works!